If you have ever wondered how to process your images using React Native OpenCV, then you're in the right place. Below we show you how to use React Native and OpenCV step by step.
A QUICK SUMMARY – FOR THE BUSY ONES
What is OpenCV: Open Source Computer Vision Library (OpenCV) is an open-source software library for computer vision and machine learning. It offers over 2500 optimized algorithms for tasks like face detection, object identification, motion tracking, and more.
OpenCV and React Native: Though integrating OpenCV with React Native has some challenges, it's possible and useful for tasks that require image processing. Existing resources and libraries can help you achieve this integration.
Tutorial Overview: The tutorial guides you through building a React Native project that uses OpenCV to determine if a captured photo is clear or blurred. The steps are divided into Android and iOS setups, with code snippets provided for each.
TABLE OF CONTENTS
OpenCV enables React Native developers to process images on mobile devices (most likely you’d like to process images taken by your device’s camera).
The top advantages are evident:
Let me show you how I used the OpenCV and React Native step by step to process my images, but first a few words of introduction.
OpenCV (Open Source Computer Vision Library) is an open source computer vision and machine learning software library. OpenCV was built to provide a common infrastructure for computer vision applications and to accelerate the use of machine perception in the commercial products.
The library has more than 2500 optimized algorithms, including a comprehensive set of both classic and state-of-the-art computer vision and machine learning algorithms.
These algorithms can be used to detect and recognize faces, identify objects, classify human actions in videos, track camera movements, track moving objects, extract 3D models of objects, produce 3D point clouds from stereo cameras, stitch images together to produce a high resolution image of an entire scene.
It can also find similar images from an image database, remove red eyes from images taken using flash, follow eye movements, recognize scenery and establish markers to overlay it with augmented reality, etc.
OpenCV has more than 47k people community and an estimated number of downloads exceeding 14 million. The library is used extensively in companies, research groups and by governmental bodies. OpenCV is written natively in C++.
Since 2010 OpenCV was ported to the Android environment, it allows using the full power of the library in mobile applications development. In 2012 OpenCV development team actively worked on adding extended support for iOS. Full integration is available since version 2.4.2 (2012).
React Native was first released in 2015 by Facebook. React Native lets you build mobile apps using only JavaScript. It uses the same design as React, letting you compose a rich mobile UI from declarative components.
If we google for “react native opencv” we stumble upon the following links:
In this tutorial, we will be building an example project which uses the device’s camera to take a photo, processes it with native code and returns the information if the taken image is blurred or clear. Doing it in plain JavaScript would be highly ineffective. JavaScript is not sufficient for very heavy calculations.
Take a note that we are by no means Java or Objective-C developers hence our Java/Objective-C code may be far from good. If you want to contribute to this subject, please contact us.
Here's what we're going to do:
Android Setup:
iOS Setup:
JavaScript Integration:
Now, let's go through these step in more detail.
react-native init reactNativeOpenCvTutorial
Run downloadAndInsertOpenCV.sh script in your project’s catalog (can be found here) which downloads and inserts openCV files for both Android and iOS. The paths in the file might not match your preferences so you may need to change them.
Open your project in Android Studio.
Follow the tips in Android Studio for synchronizing your project.
Download the newest version of OpenCV for Android. In my case, it’s 3.4.1.
Import OpenCV to Android Studio – from File -> New -> Import Module, choose sdk/java folder in the unzipped OpenCV archive.
Update build.gradle under imported OpenCV module to update 4 fields to match your project’s build.gradle:
Add module dependency:
Application -> Module Settings, and select the “Dependencies” tab. Click “+” icon at the bottom, choose “Module Dependency” and select the imported OpenCV module.
For Android Studio v1.2.2, to access Module Settings in the project view, right-click the dependent module -> Open Module Settings.

Click on the “+”, select “Module dependency” and select the OpenCV library from the list.

Inside android/app/src/java create a package called i.e. “com.reactlibrary”.
Update your Manifest with proper permissions:

See the whole file.
Create a file RNOpenCvLibraryModule.java inside your newly created package and fill it as shown here.
Create a file called RNOpenCvLibraryPackage.java inside your newly created package and fill it as shown here.
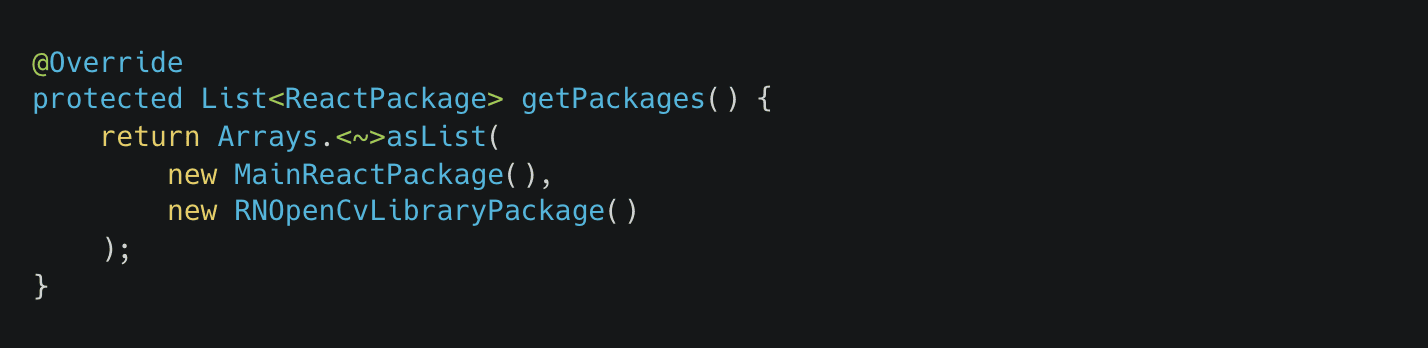
Add proper imports in your MainApplication.java file, add your OpenCV package to the list and proper code to the MainApplication class like this:

Add new RNOpenCvLibraryPackage() to your list of packages.
Add BaseLoaderCallback in your MainApplication class:

Also, add following callbacks to your MainApplication class:

See the whole file here.
Open the iOS project in XCode.
Add opencv2.framework to your Linked Frameworks and Libraries.

Create a new group in the iOS catalog. I named it “OpenCV”.
Add a .pch file and insert it into the OpenCV catalog.
Add proper content to your .pch file – shown here.
Create a file named RNOpenCvLibrary.h and fill it as shown here.
Create a file named RNOpenCvLibrary.mm and fill it as shown here.
Set “Precompile Prefix Header” to “Yes” and set “Prefix Header” path like this:

Add the following to your Info.plist file:

See the whole file.
Inside your src folder create a folder named e.g. “NativeModules” and a file named OpenCV.js and fill it with:

See the whole file.
We will be using some third-party libraries for quick setup. Open up the terminal and type:

Don’t forget to link the libraries: react-native link.
We will be using the following file as a reference.
In line 126 we set up the camera and in line 135 we create a touchable element to handle taking photos. Taking photos is handled by the takePicture function. It takes a photo, saves the data in the local state and proceeds to check if the photo is blurred.
The function proceedWithCheckingBlurryImage uses native function checkForBlurryImage and returns a simple information if the photo is blurred or not.
If you encounter build problems for Android connected to the camera, refer to my build.gradle file, especially maven { url “https://jitpack.io” } line and resync the project in Android Studio.
If you have errors related to Google Play services, check this issue on GitHub.
If you have errors related to react-native-camera, check the master branch by changing the version in package.json like this:

An example clear photo. We receive a preview of the photo and have the option to either use it or repeat it.

An example blurred photo. We receive a toast message informing us that the photo is blurred and have to repeat it.

Don’t forget to see the final product on our GitHub!
Our promise
Every year, Brainhub helps founders, leaders and software engineers make smart tech decisions. We earn that trust by openly sharing our insights based on practical software engineering experience.
Authors
Full-stack software engineer with 8 years of professional experience. Passionate of React.js and React Native. Graduate of The Silesian University of Technology.
Software development enthusiast with 8 years of professional experience in this industry.
Full-stack software engineer with 8 years of professional experience. Passionate of React.js and React Native. Graduate of The Silesian University of Technology.
Software development enthusiast with 8 years of professional experience in this industry.
Read next
Popular this month
previous article in this collection
It's the first one.
